Mixed Commands (Player & Entity)
These custom commands work for Player but also for Entity
So in:
- playerCommands
- targetCommands
- entityCommands
- ownerCommands
- ...
Sorted by alphabetical order
ADD_TEMPORARY_ATTRIBUTE
- Info: Adds temporary attributes to a player/entity
- Command settings:
{attribute}: Attribute list{amount}: Double value that the temp attribute will have{operation}: Operation list{time in ticks}: Amount of time before the attribute expires
- Example:
ADD_TEMPORARY_ATTRIBUTE GRAVITY 2 ADD_NUMBER 5
ALL_PLAYERS
- Info: Targets all players.
- Command setting:
{command}: The command that will be executed
- Example:
activators:
  activator0: # Activator ID, you can create as many activators on the activators list
    option: # Here goes an activator that is at least instance of player
    commands:
    - ALL_PLAYERS SEND_MESSAGE Hello %parseother_`{%around_target%}`_`{player_name}`%
  activator1: # Activator ID, you can create as many activators on the activators list
    option: # Here goes an activator that is at least instance of target
    targetCommands:
    - ALL_PLAYERS SEND_MESSAGE %target% has been hit by %player%
  activator2: # Activator ID, you can create as many activators on the activators list
    option: # Here goes an activator that is at least instance of entity
    entityCommands:
    - ALL_PLAYERS SEND_MESSAGE %entity% has been hit by %player%
Run multiple commands : Give a random item to all player, all players will not have the same.
activators:
  activator0: # Activator ID, you can create as many activators on the activators list
    option: # Here goes an activator that is at least instance of player
    commands:
    - ALL_PLAYERS RANDOM_RUN selectionCount:1 <+> ei give %around_target% candy1 1 <+> ei give %around_target% candy2 1 <+> ei give %around_target% candy3 1 <+> RANDOM_END
  activator1: # Activator ID, you can create as many activators on the activators list
    option: # Here goes an activator that is at least instance of target
    targetCommands:
    - ALL_PLAYERS RANDOM_RUN selectionCount:1 <+> ei give %around_target% candy1 1 <+> ei give %around_target% candy2 1 <+> ei give %around_target% candy3 1 <+> RANDOM_END
  activator2: # Activator ID, you can create as many activators on the activators list
    option: # Here goes an activator that is at least instance of entity
    entityCommands:
    - ALL_PLAYERS RANDOM_RUN selectionCount:1 <+> ei give %around_target% candy1 1 <+> ei give %around_target% candy2 1 <+> ei give %around_target% candy3 1 <+> RANDOM_END
ALL_MOBS
- Info: Targets all players.
- Command setting:
{command(s)}: The command that will be executed
- Example:
activators:
  activator0: # Activator ID, you can create as many activators on the activators list
    option: # Here goes an activator that is at least instance of player
    commands:
    - ALL_MOBS DAMAGE 5
    - ALL_MOBS BLACKLIST(ZOMBIE,ARMORSTAND) DAMAGE 20
    - ALL_MOBS WHITELIST(ZOMBIE) DAMAGE 20
  activator1: # Activator ID, you can create as many activators on the activators list
    option: # Here goes an activator that is at least instance of target
    targetCommands:
    - ALL_MOBS DAMAGE 5
    - ALL_MOBS BLACKLIST(ZOMBIE,ARMORSTAND) DAMAGE 20
    - ALL_MOBS WHITELIST(ZOMBIE) DAMAGE 20
  activator2: # Activator ID, you can create as many activators on the activators list
    option: # Here goes an activator that is at least instance of entity
    entityCommands:
    - ALL_MOBS DAMAGE 5
    - ALL_MOBS BLACKLIST(ZOMBIE,ARMORSTAND) DAMAGE 20
    - ALL_MOBS WHITELIST(ZOMBIE) DAMAGE 20
Run multiple commands:
activators:
  activator0: # Activator ID, you can create as many activators on the activators list
    option: # Here goes an activator that is at least instance of player
    commands:
    - ALL_MOBS DAMAGE 5 <+> effect give %around_target_uuid% strength 10 1
  activator1: # Activator ID, you can create as many activators on the activators list
    option: # Here goes an activator that is at least instance of target
    targetCommands:
    - ALL_MOBS DAMAGE 5 <+> effect give %around_target_uuid% strength 10 1
  activator2: # Activator ID, you can create as many activators on the activators list
    option: # Here goes an activator that is at least instance of entity
    entityCommands:
    - ALL_MOBS DAMAGE 5 <+> effect give %around_target_uuid% strength 10 1
It supports blacklist and whitelist
AROUND
- Info: Targets players in a specific radius and makes them run commands
- Command settings:
{distance}: To how far in radius the command will select players (Default 3){displayMsgIfNoPlayer}: (true or false) To notify the user of the item if it managed to target players or not (Default true){throughBlocks}: it will affect or not the players that are behind blocks (Default true){safeDistance}: If the distance between the target and the launcher are below or equals to the safeDistance value then the target will not be affected. (Default 0){commands}: The commands that will be executed for the target players.
You can add multiple commands ! Use the separator <+>
Example: SEND_MESSAGE &cYou will be damaged in 5 seconds <+> DELAY 5 <+> DAMAGE 5
Placeholders: The placeholders are the same that the Player Placeholders but you need to replace "player" by "around_target"
Example: %around_target%, %around_target_uuid%
- Examples:
This summons lightning at players in a 20 block radius
activators:
  activator0: # Activator ID, you can create as many activator on the activators list
    option: # Here goes an activator that is at least instance of player
    commands:
    - AROUND distance:20 displayMsgIfNoPlayer:false execute at %around_target% run summon lightning_bolt
Send a message to players between 5 and 10 blocks
activators:
  activator0: # Activator ID, you can create as many activator on the activators list
    option: # Here goes an activator that is at least instance of player
    commands:
    - AROUND distance:10 displayMsgIfNoPlayer:true throughBlocks:true safeDistance:5 SENDMESSAGE &eIt is a test !
You can nest AROUND with the commands : AROUND, IF, NEAREST, ALL_PLAYERS
If you do that the separator and the placeholders will evolve depending of the nested step.
base command separator : <+>
first nested command : <+::step1>
... : <+::step2>; , <+::step3>, ...
base placeholder : %around_target%
first nested command : %around_target::step1%
... : %around_target::step2%, %around_target::step3%, ...
Examples:
activators:
  activator0: # Activator ID, you can create as many activator on the activators list
    option: # Here goes an activator that is at least instance of player
    commands:
    - AROUND distance:5 displayMsgIfNoPlayer:false say &a(0)&e%around_target% <+> DELAY 3 <+> AROUND distance:5 displayMsgIfNoPlayer:false say &a(1)&e%around_target::step1% <+::step1> DELAY 3 <+::step1> AROUND distance:5 displayMsgIfNoPlayer:false say &a(2)&e%around_target::step2%
activators:
  activator0: # Activator ID, you can create as many activator on the activators list
    option: # Here goes an activator that is at least instance of player
    commands:
    - AROUND say &a(0)&e%around_target% <+> DELAY 3 <+> NEAREST 10 say &a(1)&e%around_target::step1%
activators:
  activator0: # Activator ID, you can create as many activator on the activators list
    option: # Here goes an activator that is at least instance of player
    commands:
    - AROUND distance:10 throughBlocks:false displayMsgIfNoPlayer:false say &a(0)&e%around_target% <+> DELAY 3 <+> AROUND distance:5 displayMsgIfNoPlayer:false say &a(1)&e%around_target::step1% and x &c%around_target_x::step1% <+::step1> IF %around_target_x::step1%>10 say &aThe target &e%around_target_x::step2% <+::step2> effect give %around_target::step2% slowness 20
You can add custom placeholders conditions to adjust the players targeted
Format: AROUND <settings> CONDITIONS(<conditions>) <command>
<settings> are the command settings
<conditions> are the conditions
Conditions Format: CONDITIONS(%::<my_placeholder_name>::%<comparator><value>)
<my_placeholder_name> is the name of the placeholder
<comparator> The comparator : "<", "<=", "=", ">", ">="
<value> the value
You can add multiple conditions using the separator "&&"
- Examples:
activators:
  activator0: # Activator ID, you can create as many activator on the activators list
    option: # Here goes an activator that is at least instance of player
    commands:
    - 'AROUND distance:10 CONDITIONS(%::player_health::%>10&&%::player_name::%=2Ssomar) SEND_MESSAGE &eclick'
Keep in mind that the CONDITIONS() part parses the placeholders in it with the player selected by the AROUND command. So what actually happened in the placeholders above is that it checks if the target's health is greater than 10 and if that player who got selected by the AROUND command is named "2Ssomar"
activators:
  activator0: # Activator ID, you can create as many activator on the activators list
    option: # Here goes an activator that is at least instance of player
    commands:
    - AROUND distance:10 displayMsgIfNoPlayer:false CONDITIONS(%::parseother_`{%player%}`_`{betterteams_name}`::%!=%::betterteams_name::%) effect give %around_target% weakness 10 10 true
activators:
  activator0: # Activator ID, you can create as many activator on the activators list
    option: # Here goes an activator that is at least instance of player
    commands:
    - 'AROUND distance:2 CONDITIONS(%::player_name::%!=%player%) DAMAGE 15'
Placeholders that came from plugins like ExecutableItems, ExecutableBlocks will be parsed not by the player affected by the AROUND command.
For example, with ExecutableBlocks, CONDITIONS(%var_faction%=%::factionsuuid_faction_name::%) works through checking if the block's factions variable value is equal to the targetted player's faction
Placeholder Source: PlaceholderAPI)
BACK_DASH
- Info: Launches the player/target at the opposite direction of where they are facing at (YOU CANNOT BE LAUNCHED IN THE AIR)
- Command setting:
{amount}: The value to how strong the launch will be
- Example:
activators:
  activator0: # Activator ID, you can create as many activators on the activators list
    option: # Here goes an activator that is at least instance of player
    commands:
    - BACK_DASH 5
  activator1: # Activator ID, you can create as many activators on the activators list
    option: # Here goes an activator that is at least instance of target
    targetCommands:
    - BACK_DASH 5
  activator2: # Activator ID, you can create as many activators on the activators list
    option: # Here goes an activator that is at least instance of entity
    entityCommands:
    - BACK_DASH 5
BURN
- Info: Burns the player/target
- Command setting:
{timeinsecs}: Time of burn in seconds- Example:
activators:
  activator0: # Activator ID, you can create as many activators on the activators list
    option: # Here goes an activator that is at least instance of player
    commands:
    - BURN 200
  activator1: # Activator ID, you can create as many activators on the activators list
    option: # Here goes an activator that is at least instance of target
    targetCommands:
    - BURN 200
  activator2: # Activator ID, you can create as many activators on the activators list
    option: # Here goes an activator that is at least instance of entity
    entityCommands:
    - BURN 200
CONSOLE_MESSAGE
- Info: Sends a message to the console
- Command setting:
{text}: Text to send tho the console
- Example:
activators:
  activator0: # Activator ID, you can create as many activators on the activators list
    option: # Here goes an activator that is at least instance of player
    commands:
    - CONSOLE_MESSAGE This is a debug message sent to the %player%
  activator1: # Activator ID, you can create as many activators on the activators list
    option: # Here goes an activator that is at least instance of target
    targetCommands:
    - CONSOLE_MESSAGE This is a debug message sent to the %player% triggered by %target%
  activator2: # Activator ID, you can create as many activators on the activators list
    option: # Here goes an activator that is at least instance of entity
    entityCommands:
    - CONSOLE_MESSAGE This is a debug message sent to the %player% triggered by %entity%
COPY_EFFECTS
- Info: Copy the effects of the target
- Command setting:
[limitDuration]: (Optional) (default = no limit) it means if the target has for example 3 mins of poison effect, if you limit it to 5 secs, you will only receive a poison effect of 5 seconds
- Example:
activators:
  activator0: # Activator ID, you can create as many activators on the activators list
    option: # Here goes an activator that is at least instance of player
    commands:
    - COPY_EFFECTS 5 # Using this will copy the player's own effects
  activator1: # Activator ID, you can create as many activators on the activators list
    option: # Here goes an activator that is at least instance of target
    targetCommands:
    - COPY_EFFECTS 5 # Using this will copy the target effects into the player
  activator2: # Activator ID, you can create as many activators on the activators list
    option: # Here goes an activator that is at least instance of entity
    entityCommands:
    - COPY_EFFECTS 5 # Using this will copy the entity effects into the player
CUSTOMDASH1
- Info: Launches you to a specific location
- Command settings:
{x}: X-Coordinate{y}: Y-Coordinate{z}: Z-Coordinate{fallDamage}: true or false. Whether the player will take fall damage or not after getting launched by it.
- Example:
activators:
  activator0: # Activator ID, you can create as many activators on the activators list
    option: # Here goes an activator that is at least instance of player
    commands:
    - CUSTOMDASH1 %player_x% %player_y%+5 %player_z% true # This will dash up the player
  activator1: # Activator ID, you can create as many activators on the activators list
    option: # Here goes an activator that is at least instance of target
    targetCommands:
    - CUSTOMDASH1 %target_x% %target_y%+5 %target_z% true # This will dash up the target
  activator2: # Activator ID, you can create as many activators on the activators list
    option: # Here goes an activator that is at least instance of entity
    entityCommands:
    - CUSTOMDASH1 %entity_x% %entity_y% %entity_z% true # This will dash up the entity
If you have activators that are related between two type of targets then you can do
- Example 1 | Instance of player - entity | Dash the player towards the entity
activators:
  activator0: # Activator ID, you can create as many activators on the activators list
    option: # Activator instance of player and entity
    commands:
    - CUSTOMDASH1 %entity_x% %entity_y% %entity_z% true
    entityCommands: []
- Example 2 | Instance of player - entity | Dash the entity towards the player
activators:
  activator0: # Activator ID, you can create as many activators on the activators list
    option: # Activator instance of player and entity
    commands: []
    entityCommands:
    - CUSTOMDASH1 %player_x% %player_y% %player_z% true
- Example 3 | Instance of player - block | Dash the player towards the block
activators:
  activator0: # Activator ID, you can create as many activators on the activators list
    option: # Activator instance of player and block
    commands:
    - CUSTOMDASH1 %block_x% %block_y% %block_z% true
    blockCommands: []
You can increase the strength of the command running many times the command (but not on the same tick they must be differentiated in time otherwise it won't make sense since you are making the player dash from the same position against the location), examples:
- Running it many times manually
activators:
  activator0: # Activator ID, you can create as many activators on the activators list
    option: # Here goes an activator that is at least instance of player
    commands:
    - CUSTOMDASH1 %player_x% %player_y%+5 %player_z% true # This will dash up the player
    - DELAYTICK 1
    - CUSTOMDASH1 %player_x% %player_y%+5 %player_z% true # This will dash up the player
    - DELAYTICK 1
    - CUSTOMDASH1 %player_x% %player_y%+5 %player_z% true # This will dash up the player
- Using LOOP START Utility command
activators:
  activator0: # Activator ID, you can create as many activators on the activators list
    option: # Here goes an activator that is at least instance of player
    commands:
    - 'LOOP START: 3'
    - CUSTOMDASH1 %player_x% %player_y%+5 %player_z% true # This will dash up the player
    - DELAYTICK 1
    - LOOP END
CUSTOMDASH2
- Info: Launches you away from a specific location
- Command settings:
{x}: X-Coordinate{y}: Y-Coordinate{z}: Z-Coordinate{strength}: Strength of the dash
- Example:
activators:
  activator0: # Activator ID, you can create as many activators on the activators list
    option: # Here goes an activator that is at least instance of player
    commands:
    - CUSTOMDASH2 %player_x% %player_y%+5 %player_z% 5 # This will dash down the player with strength 5
  activator1: # Activator ID, you can create as many activators on the activators list
    option: # Here goes an activator that is at least instance of target
    targetCommands:
    - CUSTOMDASH2 %target_x% %target_y%+5 %target_z% 5 # This will dash down the target with strength 5
  activator2: # Activator ID, you can create as many activators on the activators list
    option: # Here goes an activator that is at least instance of entity
    entityCommands:
    - CUSTOMDASH2 %entity_x% %entity_y% %entity_z% 5 # This will dash down the entity with strength 5
If you have activators that are related between two type of targets then you can do
- Example 1 | Instance of player - entity | Dash the player away from the entity
activators:
  activator0: # Activator ID, you can create as many activators on the activators list
    option: # Activator instance of player and entity
    commands:
    - CUSTOMDASH1 %entity_x% %entity_y% %entity_z% 5
    entityCommands: []
- Example 2 | Instance of player - entity | Dash the entity away from the player
activators:
  activator0: # Activator ID, you can create as many activators on the activators list
    option: # Activator instance of player and entity
    commands: []
    entityCommands:
    - CUSTOMDASH1 %player_x% %player_y% %player_z% 5
- Example 3 | Instance of player - block | Dash the player away from the block
activators:
  activator0: # Activator ID, you can create as many activators on the activators list
    option: # Activator instance of player and block
    commands:
    - CUSTOMDASH1 %block_x% %block_y% %block_z% 5
    blockCommands: []
CUSTOMDASH3
- Info: Dashes the target following a specific math function
- Command settings:
{function}: The math function to follow. Function calculator website{max x value}: Max x value of the function{front z}: If the dash is frontward or backwardsti
- Example:
activators:
  activator0: # Activator ID, you can create as many activators on the activators list
    option: # Here goes an activator that is at least instance of player
    commands:
    - CUSTOMDASH3 cosx 10 true
  activator1: # Activator ID, you can create as many activators on the activators list
    option: # Here goes an activator that is at least instance of target
    targetCommands:
    - CUSTOMDASH3 cosx 10 true
  activator2: # Activator ID, you can create as many activators on the activators list
    option: # Here goes an activator that is at least instance of entity
    entityCommands:
    - CUSTOMDASH3 cosx 10 true
DAMAGE
- Info: Damages the player with a specific amount. (Damage dealt with the help of this command is counted as player damage)
-
This command triggers the activators related to damage of ExecutableItems and ExecutableEvents
-
The spigot damage type is ENTITY_ATTACK if there is a player involved on the activator.
Otherwise, the spigot damage type is CUSTOM
-
- Command settings:
{amount}: Amount of damage in hitpoints (Not in hearts){amplified If Strength Effect}: true or false, Strength 1 -> + 1.5 damage, ....{amplified with attack attribute}: true or false, player with 500% bonus damage, the command will do 5 x "<damage>".{damageType}: The type of damage -> DamageType List
- Example:
activators:
  activator0: # Activator ID, you can create as many activators on the activators list
    option: # Here goes an activator that is at least instance of player
    commands:
    - DAMAGE 20 true true # Apply 20 of damage to the player
  activator1: # Activator ID, you can create as many activators on the activators list
    option: # Here goes an activator that is at least instance of target
    targetCommands:
    - DAMAGE 20 true true # Apply 20 of damage to the target
  activator2: # Activator ID, you can create as many activators on the activators list
    option: # Here goes an activator that is at least instance of entity
    entityCommands:
    - DAMAGE 20 true true # Apply 20 of damage to the entity
activators:
  activator0: # Activator ID, you can create as many activators on the activators list
    option: # Here goes an activator that is at least instance of player
    commands:
    - DAMAGE 25% # Will apply 25% of the max health of the player as damage
  activator1: # Activator ID, you can create as many activators on the activators list
    option: # Here goes an activator that is at least instance of target
    targetCommands:
    - DAMAGE 25% # Will apply 25% of the max health of the target as damage
  activator2: # Activator ID, you can create as many activators on the activators list
    option: # Here goes an activator that is at least instance of entity
    entityCommands:
    - DAMAGE 25% # Will apply 25% of the max health of the entity as damage
To apply real damage you can use:
- 1.20.5++ use /minecraft:damage command, for example
minecraft:damage %target% 10 by %player%
- 1.20.5-- use REGAIN HEALTH command, is not the best but its a workaround.
DAMAGE_NO_KNOCKBACK
- Info: Damages the player with a specific amount without applying knockback. (Damage dealt with the help of this command is not counted as player damage and more of an indirect damage)
-
This command triggers the activators related to damage of ExecutableItems and ExecutableEvents
-
The spigot damage type is ENTITY_ATTACK if there is a player involved on the activator.
Otherwise, the spigot damage type is CUSTOM
-
- Command settings:
{amount}: Amount of damage in hitpoints (Not in hearts){amplified If Strength Effect}: true or false, Strength 1 -> + 1.5 damage, ....{amplified with attack attribute}: true or false, player with 500% bonus damage, the command will do 5 x "<damage>".
- Example:
activators:
  activator0: # Activator ID, you can create as many activators on the activators list
    option: # Here goes an activator that is at least instance of player
    commands:
    - DAMAGE_NO_KNOCKBACK 20 true true # Apply 20 of damage to the player
  activator1: # Activator ID, you can create as many activators on the activators list
    option: # Here goes an activator that is at least instance of target
    targetCommands:
    - DAMAGE_NO_KNOCKBACK 20 true true # Apply 20 of damage to the target
  activator2: # Activator ID, you can create as many activators on the activators list
    option: # Here goes an activator that is at least instance of entity
    entityCommands:
    - DAMAGE_NO_KNOCKBACK 20 true true # Apply 20 of damage to the entity
activators:
  activator0: # Activator ID, you can create as many activators on the activators list
    option: # Here goes an activator that is at least instance of player
    commands:
    - DAMAGE_NO_KNOCKBACK 25% # Will apply 25% of the max health of the player as damage
  activator1: # Activator ID, you can create as many activators on the activators list
    option: # Here goes an activator that is at least instance of target
    targetCommands:
    - DAMAGE_NO_KNOCKBACK 25% # Will apply 25% of the max health of the target as damage
  activator2: # Activator ID, you can create as many activators on the activators list
    option: # Here goes an activator that is at least instance of entity
    entityCommands:
    - DAMAGE_NO_KNOCKBACK 25% # Will apply 25% of the max health of the entity as damage
DAMAGE_BOOST
- Info: Allows you to give yourself custom damage boost
- This command boost the damage of custom commands too e.g. (DAMAGE, DAMAGE_NO_KNOCKBACK)
- This command doesn't boost the damage for projectiles
- Command settings:
{modification in percentage example 100}: Amount of the boost. Example below:- 50 = Makes you deal +50% damage
- -80 = Makes you deal -80% damage
{timeinticks}: The duration of the custom damage boost
- Example: (The command below gives you +50% damage dealen for 10s)
activators:
  activator0: # Activator ID, you can create as many activators on the activators list
    option: # Here goes an activator that is at least instance of player
    commands:
    - DAMAGE_BOOST 50 200 # This will boost the damage of the player
  activator1: # Activator ID, you can create as many activators on the activators list
    option: # Here goes an activator that is at least instance of target
    targetCommands:
    - DAMAGE_BOOST 50 200 # This will boost the damage of the target
  activator2: # Activator ID, you can create as many activators on the activators list
    option: # Here goes an activator that is at least instance of entity
    entityCommands:
    - DAMAGE_BOOST 50 200 # This will boost the damage of the entity
This command can be used many time and the boost will get stacked, on this example you will see that [0-10] seconds the player will apply 50% more damage then on [10-20] seconds will apply 100% more damage and then on [20-30] seconds of 50% more damage, due that on [10-20] two commands were stacked of DAMAGE_BOOST.
activators:
  activator0: # Activator ID, you can create as many activators on the activators list
    option: # Here goes an activator that is at least instance of player
    commands:
    - DAMAGE_BOOST 50 200 # This will boost the damage of the player by 50% for 200 ticks (10 seconds)
    - DELAY 10 # Delay of 10 seconds
    - DAMAGE_BOOST 50 200 # This will boost the damage of the player by 50% for 200 ticks (10 seconds)
DAMAGE_RESISTANCE
- Info: Allows you to give yourself custom damage resistance by giving yourself customized damage intake magnifications
- Command settings:
{modification in percentage example 100}: Amount of the magnification. Example below:- 50 = Makes you take +50% damage
-80 = Makes you take -80% damage
- 50 = Makes you take +50% damage
{timeinticks}: The duration of the custom damage resistance
- Example: (The command below gives you +50% damage taken for 10s)
- DAMAGE_RESISTANCE 50 200
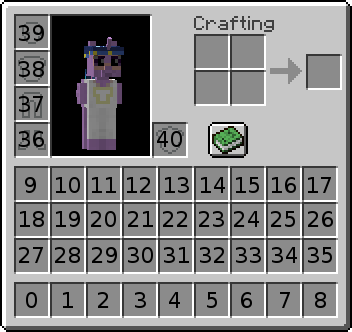
EQUIPMENT_VISUAL_REPLACE
- Info: Replaces VISUALLY (there is no risk for losing items) a equipment slot with certain material
- Command settings:
{EquipmentSlot}: The slot- Options:
- -1
- 40
- 36
- 37
- 38
- 39
- Options:
{material}: The item id of the material you want to replace with or the EI id{amount}: The stack amount{timeinticks}: How long the disguise is gonna last for. (20 ticks = 1 sec)
- Example:
- EQUIPMENT_VISUAL_REPLACE 39 CARVED_PUMPKIN 1 100
- EQUIPMENT_VISUAL_REPLACE 39 EI:test 1 100
EQUIPMENT_VISUAL_CANCEL
- Info: Cancel the EQUIPMENT_VISUAL_REPLACE command
- Command setting:
{EquipmentSlot}: The slot- Options:
- -1
- 40
- 36
- 37
- 38
- 39
- Options:
- Example:
- EQUIPMENT_VISUAL_CANCEL 39
FORCE_DROP
- Info: It forces the player to drop the item that he has in a specific slot.
- Command setting:
{slot}: number, -1 for main hand
- Example:
- FORCE_DROP -1
FRONTDASH
- Info: Launches the player/target at the direction of where they are facing at
- Command settings:
{number}: The value to how strong the launch will be{custom_y}: To set a vertical boost (I advice you to set a little value like 0.5 - 1 if you dont want a big jump.){falldamage}: set to enable or disable the fall damage
- Example:
- FRONTDASH 5 0.5 false
GLACIAL_FREEZE
- Info: It applies the freeze of Minecraft 1.18 snow
- Command setting:
{time in ticks}: Time of the freeze in ticks. (20 ticks = 1 sec)- Example:
- GLACIAL_FREEZE 160
GLOWING
- Info: Applies glowing to the player
- Command settings:
{time in ticks}: Duration of the glow in ticks{color}: To what color will the glow have. Color Reference
- Example:
- GLOWING 100 BLUE
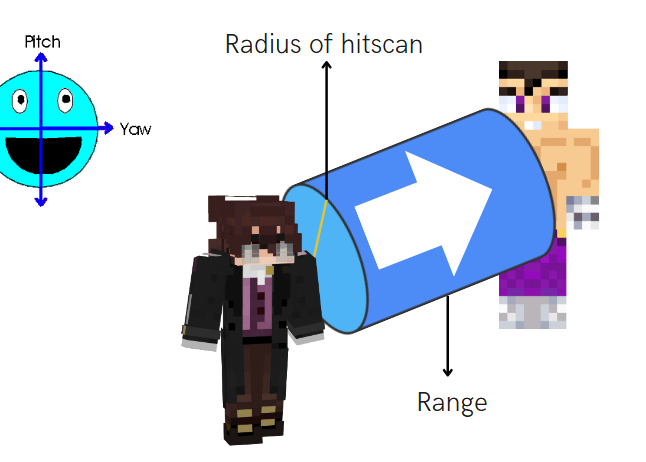
HITSCAN_PLAYERS
- Info: It allows to run a command at certain direction to players
- Command settings:
{range}: how far an entity can be to be targetted by the HITSCAN command{radiusOfHitscan}: How WIDE the cylinder is. It's basically the difference of shooting a bullet vs shooting a cannonball.{pitch}: What direction to shoot it in, relative to player pitch{yaw}: Same thing as Pitch but with yaw{leftRightShift}:- -5 = the hitscan STARTS from 5 blocks to the left.
- 0 = Hitscan is centered where the player is.
- 5 = hitscan STARTS from 5 blocks to the right of the player.
{yShift}: Same as left,right, except with a different axis.{throughEntities}: Boolean: Whether or not the HITSCAN can go through entities.{throughBlocks}: Boolean: Whether or not the HITSCAN can go through blocks.{command(s)}: The same than AROUND commands, you can typecommand1 <+> command2... and use the placeholder %around_target%
- Example:
- HITSCAN_PLAYERS range:5 radius:0 pitch:0 yaw:0 leftRightShift:0 yShift:0 throughBlocks:true throughEntities:true DAMAGE 5 <+> JUMP 5
- Image to understand:
HITSCAN_ENTITIES
- Info: It allows to run a command at certain direction to entities
- Command settings:
{range}: how far an entity can be to be targetted by the HITSCAN command{radiusOfHitscan}: How WIDE the cylinder is. It's basically the difference of shooting a bullet vs shooting a cannonball.{pitch}: What direction to shoot it in, relative to player pitch{yaw}: Same thing as Pitch but with yaw{leftRightShift}:- -5 = the hitscan STARTS from 5 blocks to the left.
- 0 = Hitscan is centered where the player is.
- 5 = hitscan STARTS from 5 blocks to the right of the player.
{yShift}: Same as left,right, except with a different axis.{throughEntities}: Boolean: Whether or not the HITSCAN can go through entities.{throughBlocks}: Boolean: Whether or not the HITSCAN can go through blocks.{command(5)}: The same than AROUND commands, you can typecommand1 <+> command2... and use the placeholder %around_target%
- Example:
HITSCAN_ENTITIES range:5 radius:0 pitch:0 yaw:0 leftRightShift:0 yShift:0 throughBlocks:true throughEntities:true HEAL 10 <+> BACKDASH 5
- Image to understand:

INVULNERABILITY
- Info: Sets the player invulnerable for a certain amount of time
- Command setting:
{ticks}: Time of the invulnerability in ticks. (20 ticks = 1 sec)- It supports negative values to decrease the invulnerability time, such as the one after being hit.
- Example:
- INVULNERABILITY 60
JUMP
- Info: Launches the player in the air
- Command setting:
{number}: To how strong the launch will be{fall damage}: (Optional) (default = false) Select if want the command to have fall damage.
- Example:
- JUMP 20
LAUNCH_ENTITY
- Info: Launches an entity to your direction
- Command settings:
{entityType}: Mob ID of the launched entity (ALL CAPS) EntityType list{speed}: (number, Double) Define the speed of the entity[angle rotation y]: (only for 1.14 and +) (Optional) (default = 0) (in degrees) Define the direction where the entity will be launched
- Example:
- LAUNCH_ENTITY PIG 2
- Example to make tri-shoot:
- LAUNCH_ENTITY PIG 2
- LAUNCH_ENTITY PIG 2 15
- LAUNCH_ENTITY PIG 2 -15
MLIB_DAMAGE
- Info: Deals damage to target but the damage type is mainly from MythicLib plugin
- Command settings:
{number}: Damage dealt to targets{damage_type}: Damage type inflicted- Example: MAGIC, PHYSICAL, WEAPON, SKILL, PROJECTILE, UNARMED, ON_HIT, MINION, DOT;
{knockback}: true/false whether it knocks back the target{element}: Specified what kind of element the attack is- Reference: Element list of MythicLib
- Example:
- MLIB_DAMAGE 10 PHYSICAL false FIRE
MOB_AROUND
- Info: Targets entities in a specific radius and makes them run commands
- Available entities -> LivingEntity list
- Command settings:
{distance}: To how far in radius the command will select entities{displayMsgIfNoEntity}: (true or false) To notify the user of the item if it didn't manage to target any mobs.- Set to false to hide the message
{throughBlocks}: it will affect or not the mobs that are behind blocks{safeDistance}: If the distance between the target and the launcher are below or equals to the safeDistance value then the target will not be affected.- You can BLACKLIST or WHITELIST entities adding one of these ones in anyplace of the command:
- BLACKLIST(ZOMBIE,ARMOR_STAND)
- WHITELIST(CHICKEN)
You can add multiple commands ! Use the separator <+>
Example: minecraft:effect give .. <+> DELAY 5 <+> DAMAGE 5
Placeholders: The placeholders are the same that the Entity Placeholders but you need to replace "player" by "around_target"
Example: %around_target%, %around_target_uuid%
- Examples:
activators:
  activator0: # Activator ID, you can create as many activator on the activators list
    option: # Here goes an activator that is at least instance of player
    commands:
    - MOB_AROUND distance:3 displayMsgIfNoEntity:true throughBlocks:true safeDistance:0 [conditions] COMMAND1 <+> COMMAND2 <+> ...
    - MOB_AROUND distance:3 displayMsgIfNoEntity:false BURN 10
    - MOB_AROUND distance:5 execute at %around_target_uuid% run summon lightning_bolt
    - MOB_AROUND distance:5 BLACKLIST(ZOMBIE,ARMOR_STAND) DAMAGE 20
    - MOB_AROUND distance:5 displayMsgIfNoEntity:false effect give %around_target_uuid% poison 10 10
    - MOB_AROUND distance:10 WHITELIST(ZOMBIE`{CustomName:"*"}`) say HELLO
To use entity nbt on the WHITELIST/BLACKLIST field, you need to install NBT API plugin
It supports NBT Tags so you can add for example something like: ZOMBIE{IsBaby:1}
Examples:
activators:
  activator0: # Activator ID, you can create as many activator on the activators list
    option: # Here goes an activator that is at least instance of player
    commands:
    - MOB_AROUND distance:7 BLACKLIST(ZOMBIE`{CustomName:"Test Test"}`,ZOMBIE`{CustomName:"Miyamoto"}`) false BURN 3
    - MOB_AROUND distance:5 WHITELIST(ZOMBIE`{IsBaby:1}`) DAMAGE 20
    - MOB_AROUND distance:9 WHITELIST(WOLF`{Owner:"%player%"}`) HEAL 5
    - MOB_AROUND distance:9 WHITELIST(WOLF`{Owner:%player_uuid%}`) HEAL 5
You can nest MOB_AROUND with the commands : MOB_AROUND, IF, MOB_NEAREST, ALL_MOBS
If you do that the separator and the placeholders will evolve depending of the nested step.\
base command separator : <+>
first nested command : <+::step1>
... : <+::step2> , <+::step3>, ...
base placeholder : %around_target%
first nested command : %around_target::step1%
... : %around_target::step2%, %around_target::step3%, ...
MOB_NEAREST
- Info: Targets the nearest mob from the player/target.
- Command settings:
{max accepted distance}: Max distance accepted that the "entity" can be.{command(s)}: The commands that will be executed
You can add multiple commands ! Use the separator <+>
Example: minecraft:effect give .. <+> DELAY 5 <+> DAMAGE 5
Placeholders: The placeholders are the same that the Entity Placeholders but you need to replace "player" by "around_target"
Example: %around_target%, %around_target_uuid%
- Example:
Damages nearest player
- MOB_NEAREST 10 DAMAGE 5
You can nest MOB_NEAREST with the commands : MOB_AROUND, IF, MOB_NEAREST, ALL_MOBS
If you do that the separator and the placeholders will evolve depending of the nested step.\
base command separator : <+>
first nested command : <+::step1>
... : <+::step2> , <+::step3>, ...
base placeholder : %around_target%
first nested command : %around_target::step1%
... : %around_target::step2%, %around_target::step3%, ...
NEAREST
- Info: Targets the nearest player from the player/target.
- Command settings:
{max accepted distance}: Max distance accepted that the "target" can be.{command}: The command that will be executed
You can add multiple commands ! Use the separator <+>
Example: SEND_MESSAGE &cYou will be damaged in 5 seconds <+> DELAY 5 <+> DAMAGE 5
Placeholders: The placeholders are the same that the Player Placeholders but you need to replace "player" by "around_target"
Example: %around_target%, %around_target_uuid%
- Example:
Damages nearest player
- NEAREST 8 DAMAGE 5
You can nest NEAREST with the commands : AROUND, IF, NEAREST, ALL_PLAYERS
If you do that the separator and the placeholders will evolve depending of the nested step.\
base command separator : <+>
first nested command : <+::step1>
... : <+::step2> , <+::step3>, ...
base placeholder : %around_target%
first nested command : %around_target::step1%
... : %around_target::step2%, %around_target::step3%, ...
OPMESSAGE
- Info: It sends a message to OP online players and the console
- Command setting:
{text}: Text to send
- Example:
- OPMESSAGE This is my debug message
PARTICLE
-
Info: Spawns particles in the player/target's location. Particles list
-
Command settings:
{type}: The type of particle (ALL CAPS){quantity}: The amount of particles that will spawn{offset}: The radius of the area where the particles may spawn in the player/target's location{speed}: To how fast or how big particles will be
-
Example:
- PARTICLE FIREWORKS_SPARK 10 0.1 0.5
REGAIN_HEALTH
- Info: Gives you a specific amount of HP
- Command setting:
{amount}: The amount of HP you want to gain- It suports negative values in case of you want to do "true damage".
- Example:
- REGAIN_HEALTH 10
- REGAIN_HEALTH -5
REMOVE_BURN
- Info: Extinguishes you from burning
- No command setting
- Example:
- REMOVE_BURN
REMOVE_GLOW
- Info: Remove the glowing effect of a specific color to the player | target.
- Command setting:
[color]: (Optional) (default = WHITE) The color to remove. Color Reference- Example:
- REMOVE_GLOW BLACK
SET_GLOW
- Info: Add the glowing effect with a specific color to the player | target.
- Command setting:
[color]: (Optional) (default = WHITE) The color to remove. Color Reference- Example:
- SET_GLOW BLACK
Compatible with the plugin TAB using -> %score_cmd-glow%
SET_HEALTH
- Info: Sets your health into a specific amount
- Command setting:
{amount}: The amount of health you want it to set to
- Example:
SET_HEALTH 10
SET_PITCH
- Info: Forces the player to look in a certain pitch position (-90/90 degrees, up down direction)
- Command settings:
{pitch_number}: The number that you want to input. Placeholders work too{keepVelocity}: It allows to keep the velocity of the player
- Example:
- SET_PITCH 0 false
- SET_PITCH %target_pitch% false
SET_YAW
- Info: Forces the player to look in a certain yaw position (360 degrees, left right direction)
- Command settings:
{yaw_number}: The number that you want to input. Placeholders work too{keepVelocity}: It allows to keep the velocity of the player
- Example:
- SET_YAW 10 false
SPIN
- Info: Spin the target
- Command settings:
{duration ticks}: The duration of the spin{velocity}: The velocity of the spin
- Example:
- SPIN 20 1
Q: How to freeze targets/players/mobs ?
A: run SPIN {duration} 0 for example
STEAL
- Info: Steal an item from the target inventory
- Command settings:
{slot}: -1 to mainhand. Check slots reference bellow.[remove item]: (Optional) (default = true)
- Example:
- STEAL 10
STRIKELIGHTNING
- Info: Strikes a lightning bolt with no damage to the one that runs the command
- No command setting
- Example:
- STRIKELIGHTNING
This is not the same as essential's smite command. If you want to smite your targets, put it on target commands or entity commands along with the proper activators like PLAYER_CLICK_ON_PLAYER for example.
STUN ENABLE/DISABLE
- Info: It will enable or disable the stun for the player (it lays you down and blocks you from moving your camera
- Commands:
- STUN_ENABLE
- STUN_DISABLE
- Example:
- STUN_ENABLE
- DELAY 5
- STUN_DISABLE
TELEPORT
- Info: Teleports the player/entity to the location
- Command settings:
{world}: The world of the location to teleport{x}: The coordinate x of the location to teleport.{y}: The coordinate y of the location to teleport.{z}: The coordinate z of the location to teleport.[pitch]: (Optional) (default = keep the player pitch) pitch of the teleport location[yaw]: (Optional) (default = keep the player yaw) yaw of the teleport location[keepVelocity]: (Optional) (default = true) Allows to not stop the player velocity.
- Example:
- TELEPORT ApocalypseWorld 70 70 70
TELEPORT_ON_CURSOR
- Info: Teleports you on your cursor
- Command settings:
{range}: To how far you want to teleport{acceptAir}: To be able to teleport even in air, you need to set this to true
- Example:
- TELEPORT_ON_CURSOR 8 true
TRANSFER_ITEM
- Info: It transfer an item on the inventory
- Command settings:
{slot of launcher}: Slot of the item who is going to move{slot of receiver}: Slot where the item will land
- Example:
- TRANSFER_ITEM 38 40
UNSAFE_TELEPORT_ON_CURSOR
- Info: Teleports you on your cursor without considering that you will end up on in impossible places
- Command setting:
[maxRange]: (Optional) (default = 200) To how far you want to teleport
- Example:
UNSAFE_TELEPORT_ON_CURSOR 20
WORLD_TELEPORT
- Info: Teleport to a world at the same location
- Command setting:
{world}: The world name where you want to teleport the player/target.- Example:
- WORLD_TELEPORT spawn_end
Animation Commands
- BREAK_BOOTS_ANIMATION
- BREAK_CHESTPLATE_ANIMATION
- BREAK_HELMET_ANIMATION
- BREAK_LEGGINGS_ANIMATION
- BREAK_MAIN_HAND_ANIMATION
- BREAK_OFF_HAND_ANIMATION
- HURT_ANIMATION
- SWING_MAIN_HAND
- SWING_OFF_HAND
- TELEPORT_ENDER_ANIMATION
- TOTEM_ANIMATION